Optimize your ad campaign and get to a positive ROI quickly.
What this quick guide will cover:
- Campaign optimization is needed
- Blacklisting is crucial
- Split testing is important
- Scaling is vital
This quick guide should take you less than seven minutes to read.
Why Optimize?
In a perfect world, you would create an ad campaign for your offer… and then just let it run forever as you rake in the money like leaves from trees in the fall.
Unfortunately, media buying is a bit of work. You should optimize your ad campaigns to make sure you’re buying a lot of the traffic that converts for you, while buying very little to none of the traffic that doesn’t.
Not all traffic will work for every offer, so the beginning of every Run-of-Network (RON) ad campaign should be marked with some basic optimization work being done.
Crucial: Blacklisting
It’s important that you learn how to use the blacklist feature. It’s a very simple way to optimize your campaign by excluding non-performing Subsources. Under BUY TRAFFIC / Filter Traffic you can create blacklists and whitelists. We recommend that you create and assign at least one blacklist to each ad campaign.
Sources can be tracked using the {$source_referrer} token and Subsources using the {$source_id} token as URL parameters in your creative or campaign URL(s).
Subsources (designated with an S at the beginning of the ID, f.ex. S123, and tracked using the {$source_id} token) are the most precise and best way to track where certain parts of your traffic are coming from, because they pinpoint traffic down to adzone levels in most cases.
Sources (designated with an R at the beginning of the ID, f.ex. R123, and tracked with the {$source_referrer} token) are less precise than Subsources, but they can be helpful to track because they provide a broader ID that is easy to find under the Sources tab of your campaign stats.
Important: Blacklisting Sources broadly using only R IDs from the {$source_referrer} token, instead of at the Subsource level using S IDs from the {$source_id} token, can be detrimental to the performance of your ad campaigns, because you may end up excluding parts of a Source’s traffic that perform well.
How to insert the {$source_referrer} and {$source_id} tokens into your creative or campaign URL(s) exactly for tracking depends on the tracking system you’re using and how it picks up URL parameters. Once you have it set up so your tracking system gets Source and Subsource IDs sent to it, you can then blacklist non-performing ones in the list editor (same place where you created the blacklist initially).
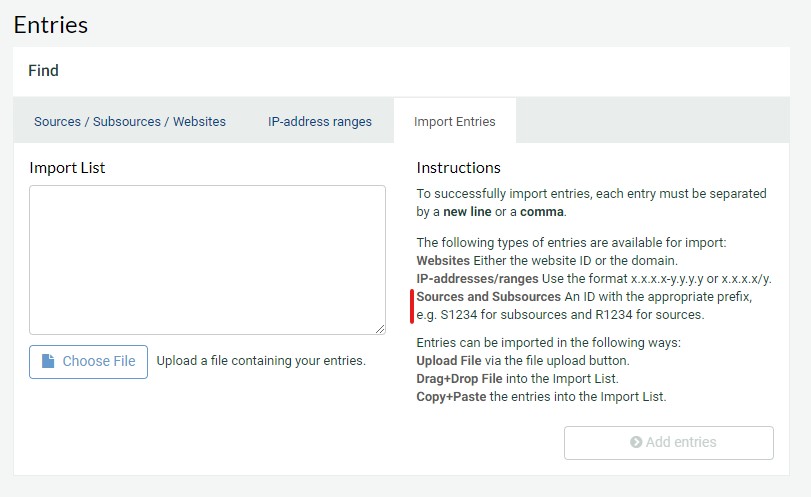
Pro Tip #1: You can also put all the Source and Subsource IDs new line or comma separated in a text file to bulk import the ones you’d like to block under the “Import Entries” tab of the list editor, as illustrated below.
Pro Tip #2: For more advanced media buyers, we recommend setting up conversion tracking and Automated Rules to automatically blacklist non-performing Subsources. That way you only need to set up a Rule and don’t have to spend time actually blacklisting.
Pro Tip #3: To learn more about how our unique Sources / Subsources system works, please read our Sources Guide.
Important: Split Testing
Part of efficient ad campaign optimization is finding what approach works best for the product or offer you’re promoting. That means you should run some split tests, where you determine what works best for a certain component of your ad campaign.
A simple example: Let’s say you want to promote a dating offer with push ads. A crucial split test for you may be concerning the push ad creatives you use. So you could take 5-10 creatives (everything else except the ad image should be kept equal), add them to a campaign and then see how each performs in terms of CTR% and conversion rate. After this split test, you should know which creatives perform best… so you’d keep those for your next test.
Test #2 may be using those ad creatives that you know work well to try out a variety of landing pages. And then you could use the same method to test your ad copy, emoji usage, etc.
The possibilities are endless. You should decide which split tests will be most important for your success and go with those primarily. The examples provided here are what our media buyers often run split tests for with their traffic purchases.
The key thing is to always be testing something. If you’re buying traffic, you may as well use this opportunity to figure out what works best instead of having to guess at it or estimate. Data doesn’t lie.
Vital: Scaling
So you’ve run a few split tests and your blacklisting is proving to be fruitful. Sources that perform well have been dialed in and you know which creatives, ad copy, etc. work thanks to your efforts. You’re on the verge of taking the profits to the next level. You can achieve a highly positive ROI. 🚀
Many media buyers will continue split testing endlessly, and that’s a solid strategy, but at junctions where you see something working well, you basically have to pull the trigger and get what you can out of your optimization. Otherwise the opportunity to do so might pass and you’ll end up spinning your wheels forever. Time is not on your side here, because your competition is also hard at work. ⌛
Luckily the practical component of scaling is easy. Just increase your CPC bid to the maximum point where you’re still profitable.
Deciding when to scale is the difficult part for most people. If you’ve been running a campaign for 3-4 days and it’s already profitable with your optimization, you should begin upping your bid rapidly to take all the traffic you can away from your competitors. It’s yours for the taking. If you don’t buy as much traffic as possible from a campaign that’s working, you’re leaving profits on the table.
Got it? Great. You’re ready to create a campaign!


