Using our Server to Server (S2S) conversion tracking postback URL, you can pass back conversion info to PlugRush. This allows for auto-optimization.
What is S2S conversion tracking?
Server to server (S2S) conversion tracking does not use cookies, but the information is stored server-side. You do not have to place any code on your website or landing page, but you do need to use a tracker or send traffic to a merchant that is capable of handling the information and transmitting conversions back via postback URLs once there is a conversion.
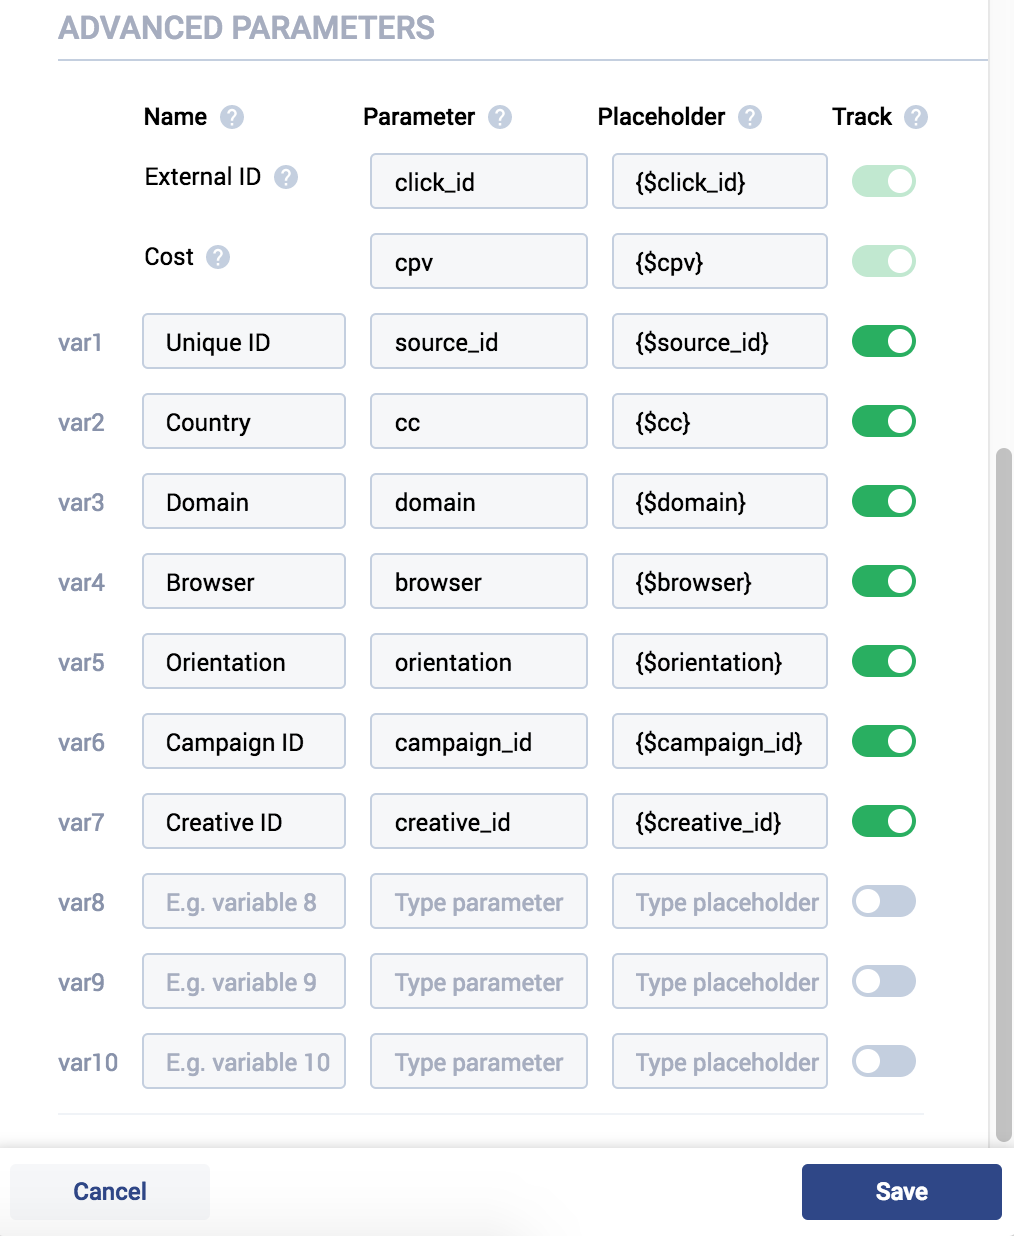
Simplified, this means that we send a unique ID (click ID) with every hit delivered to your campaign, which is then stored server side by the tracker or merchant you are sending traffic to. Once a conversion is generated, this ID (click ID) is passed back to us from the tracker or merchant via the postback URL.
Since the ID is unique to every visitor, we can store all the essential information about that particular visitor with the use of just one metric. We know the country, browser, operating system, carrier, at what time and date they were sent, and much more about the visitor, based on their click ID alone. So, in theory, the click ID parameter is the only parameter you need to use when buying traffic, as long as you have S2S conversion tracking set up.
When you analyze your campaigns and stats, you will see exactly when, where and at what time the conversion was generated right there in the campaign stats of your PlugRush account. It makes the optimisation process very easy and quick compared to not having S2S conversion tracking.
I cannot help but mention some advertisers’ concerns about sharing this information with traffic networks for fear of the network using this information to get them to pay more, which is a very valid concern. Some have expressed that this is something that other networks have done.
We can not do much else then promise here officially, that we will not be using this information for anything other than analyzing the quality of the publishers’ traffic and in general improve the service we provide based on this data. If you are hesitant to share conversion amounts, you can hardcode a fictive number in the postback URL instead of the real conversion amount.
How do I set up S2S conversion tracking?
Setting conversion tracking up can be a bit tricky depending on what your tracker setup looks like. If you use one of the major trackers or CPA networks, most have built-in capabilities for this. In some cases with CPA networks, it is not openly available, but you need to contact them to set it up.
If you use a custom system, then please contact us via any support channel, and we will do our best to help you set this up.
There are two things you need to do for this to work:
- The postback URL needs to be added to your tracker/merchant
- This can be found under ACCOUNT – API
- Pro Tip: You can also grab your conversion tracking postback URL from the campaign overview. Just click the ‘Actions’ icon (blue gear in the far right column) and select “Conversion Tracking” to bring it up. The image below illustrates where to click.
- Our click ID parameter, {$click_id}, needs to be added to your URLs
- Its placement depends on the tracker/merchant you use, and you need to consult their guidelines or documentation to know where it should be added.
Below, we’ll explain how to set it up with some well-known and broadly used tracking systems / CPA affiliate networks (i.e. AdsBridge and Mob Idea).
Setting up S2S conversion tracking between Voluum and PlugRush using our postback URL
Setting up conversion tracking between Voluum and PlugRush is relatively easy. When adding a traffic source, you can select the plugrush template. This template was recently updated, so if you are setting up PlugRush as a traffic source for the first time, all you have to do is click traffic sources, then new traffic source, and then find PlugRush in the template list and click it. It will show you the settings for PlugRush as a traffic source. It contains all the relevant tokens and parameters we recommend, whereas the click ID parameter is added automatically.
Even the postback URL is added for you, so the only thing you have to do is change the user ID in the user ID field of the postback URL. You can easily find it by going to your account profile in PlugRush.
Alternatively, you can go to ACCOUNT – API, click the server to server conversion dropdown and see what the user ID is in the postback URL field. Once the user ID is changed for your PlugRush traffic source in Voluum, you can click Save, and it should be all set up.
If you already have PlugRush set up as a traffic source in Voluum, you might have to make some changes to the traffic source settings. The settings should look like this:
The postback URL should also be added, and should be this one: https://www.prprocess.com/conversion/?user_id=REPLACE&click_id={externalid}¤cy=USD&payout={payout} where you have to replace the user ID with your PlugRush user ID as explained above.
Once you click Save, server to server conversion tracking between Voluum and PlugRush should be all set.
The next step would then be to update your campaign URLs so that we are able to send the click ID with every hit. Since we updated the traffic source settings, Voluum automatically makes sure the URLs are correct when creating new campaigns or editing existing ones. You can easily edit your campaigns in Voluum now, grab the URL which should contain the correct tokens, and then edit your campaign in PlugRush and paste the new URL.
Setting up conversion tracking between Sublime Revenue and PlugRush using our postback URL
Sublime Revenue is an affiliate network we definitely recommend you give a try. It’s created by a long-time PlugRush user / publisher / advertiser / media buyer, so they’re fully aware of the tools needed to be successful in the media buying game from every angle you could imagine.
Verticals covered at Sublime include dating, games, finance, gambling, nutra, and many more. They work with a variety of payout models like PPL, SMS / PIN submit, 1- or 2-click flows, revshare at various %, etc.
You can opt to promote offers they have accumulated by choosing individual ones directly or simply by having them choose the best one for you through the use of a smartlink.
Currently in closed beta, you can get access to the private beta version of Sublime Revenue by putting in the signup code: plugrush
Setting up conversion tracking at Sublime Rev is very simple:
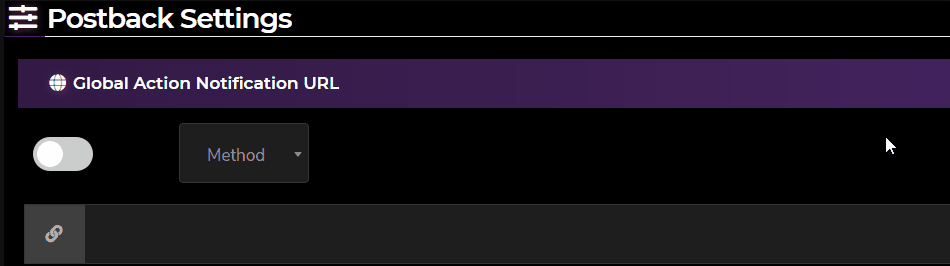
- Click the Menu button at the top right of the Sublime Revenue user interface
- Choose “S2S Postback” and then “Postback Settings”
- On the postback settings page at Sublime, put in your PlugRush S2S postback URL using Sublime’s tokens, like so:
https://www.prprocess.com/conversion/?user_id=REPLACE&click_id=[external_clickid]¤cy=USD&payout=[payout_USD](where it says REPLACE for the user_id URL parameter, put in your PlugRush user ID, which you can grab from the profile page of your PlugRush account) - Still on Sublime’s postback settings page, toggle it on and leave the GET method selected. The GIF below illustrates what we mean.
- When you’ve put in your S2S postback URL as explained, hit the SAVE button and you’re done setting up conversion tracking.
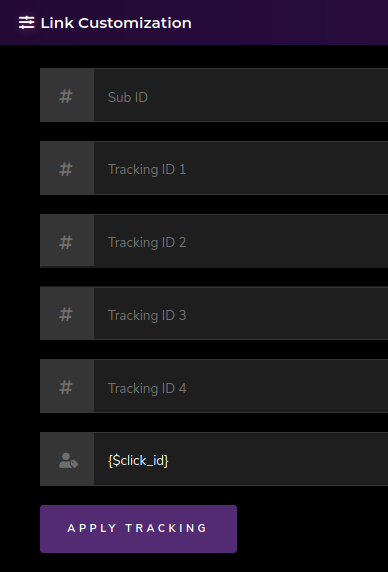
- Important: Now when you get promo tools from Sublime Revenue, please make sure you use the
{$click_id}token as External Source Click ID and click APPLY TRACKING as shown below. That way they’ll add it to the offer or smartlink URL for you, and everything will work as it should.
Setting up conversion tracking between Monetizer and PlugRush using our postback URL
You can set a global postback URL in the profile settings of your Monetizer account. Copy a postback URL which you can find at your Plugrush account here and paste it in the global postback field as shown below. You will then see that Monetizer has two macros that fit the ones we need. {clickID} and {amount}. By replacing them you should get a postback URL like this: https://www.prprocess.com/conversion/?user_id=REPLACE&click_id={clickID}¤cy=USD&payout={amount}
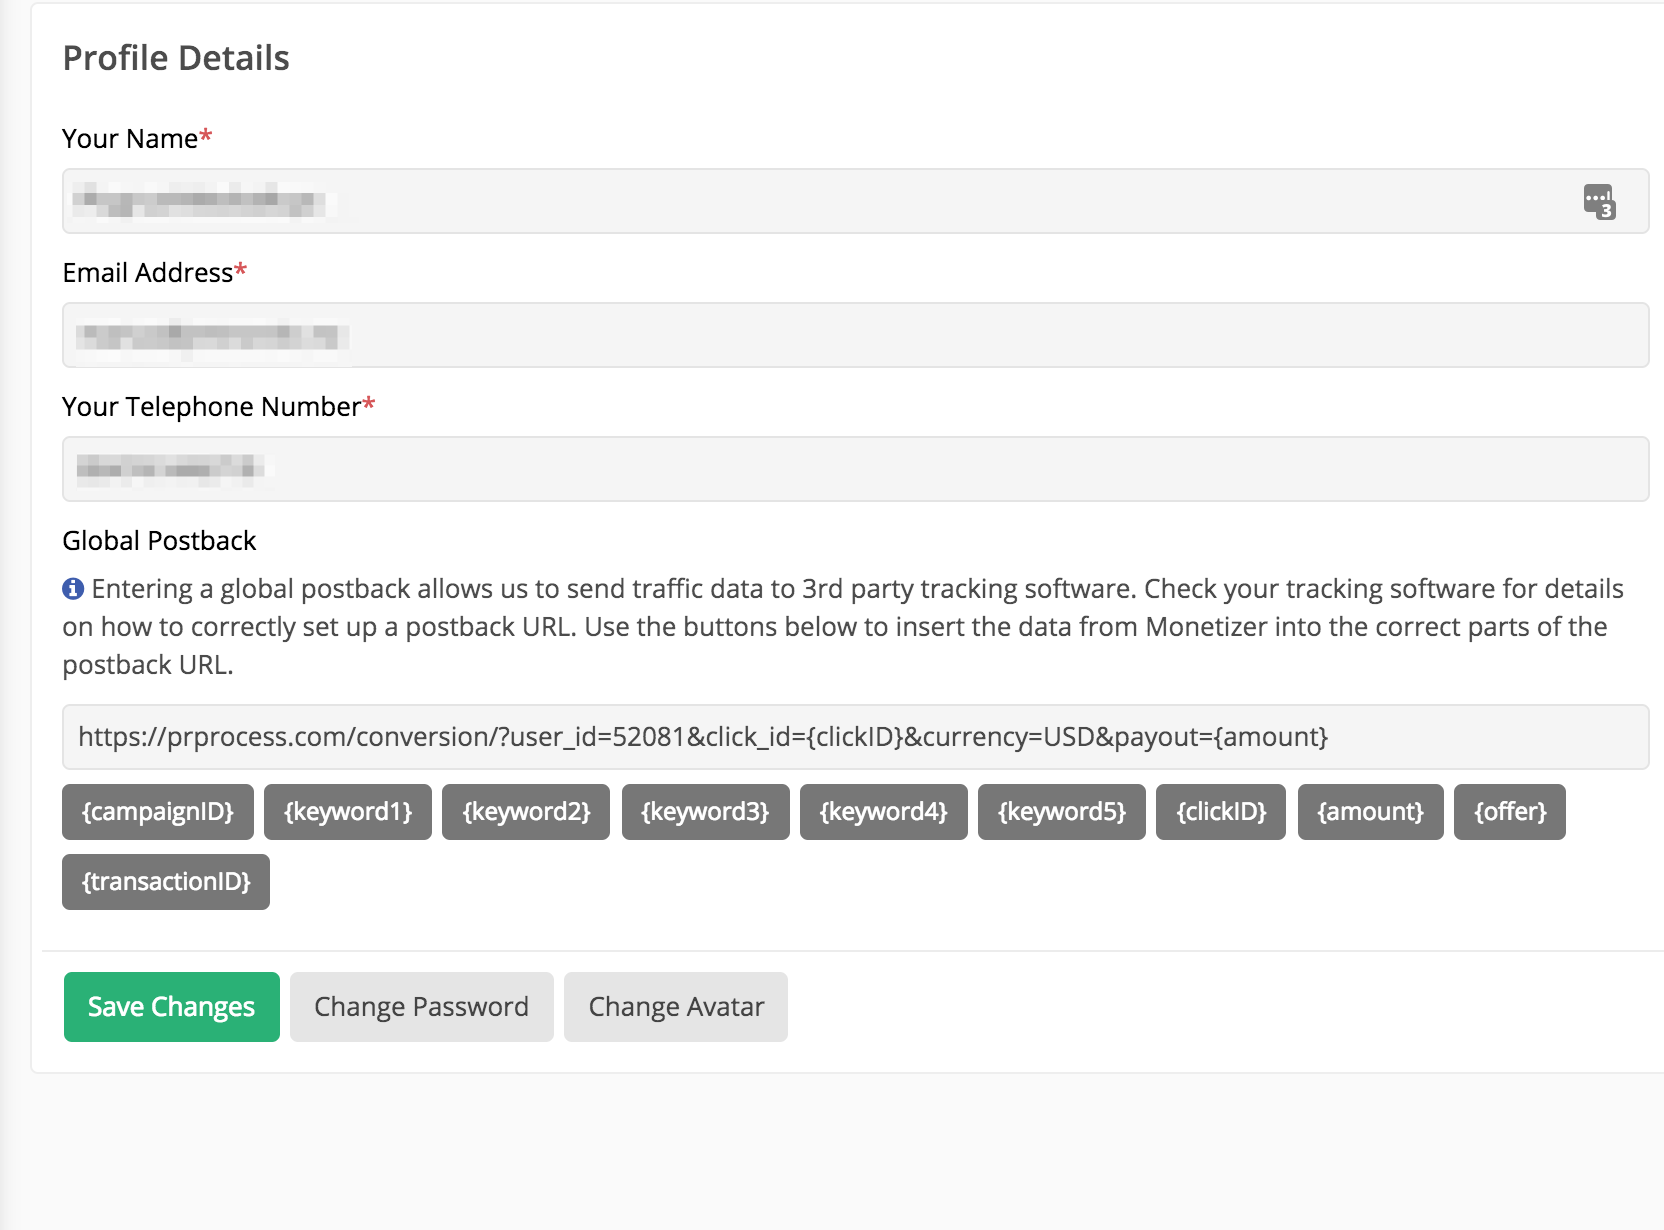
Don’t forget to insert your user ID into the postback URL. As mentioned previously, you can find your user ID in your PlugRush account profile
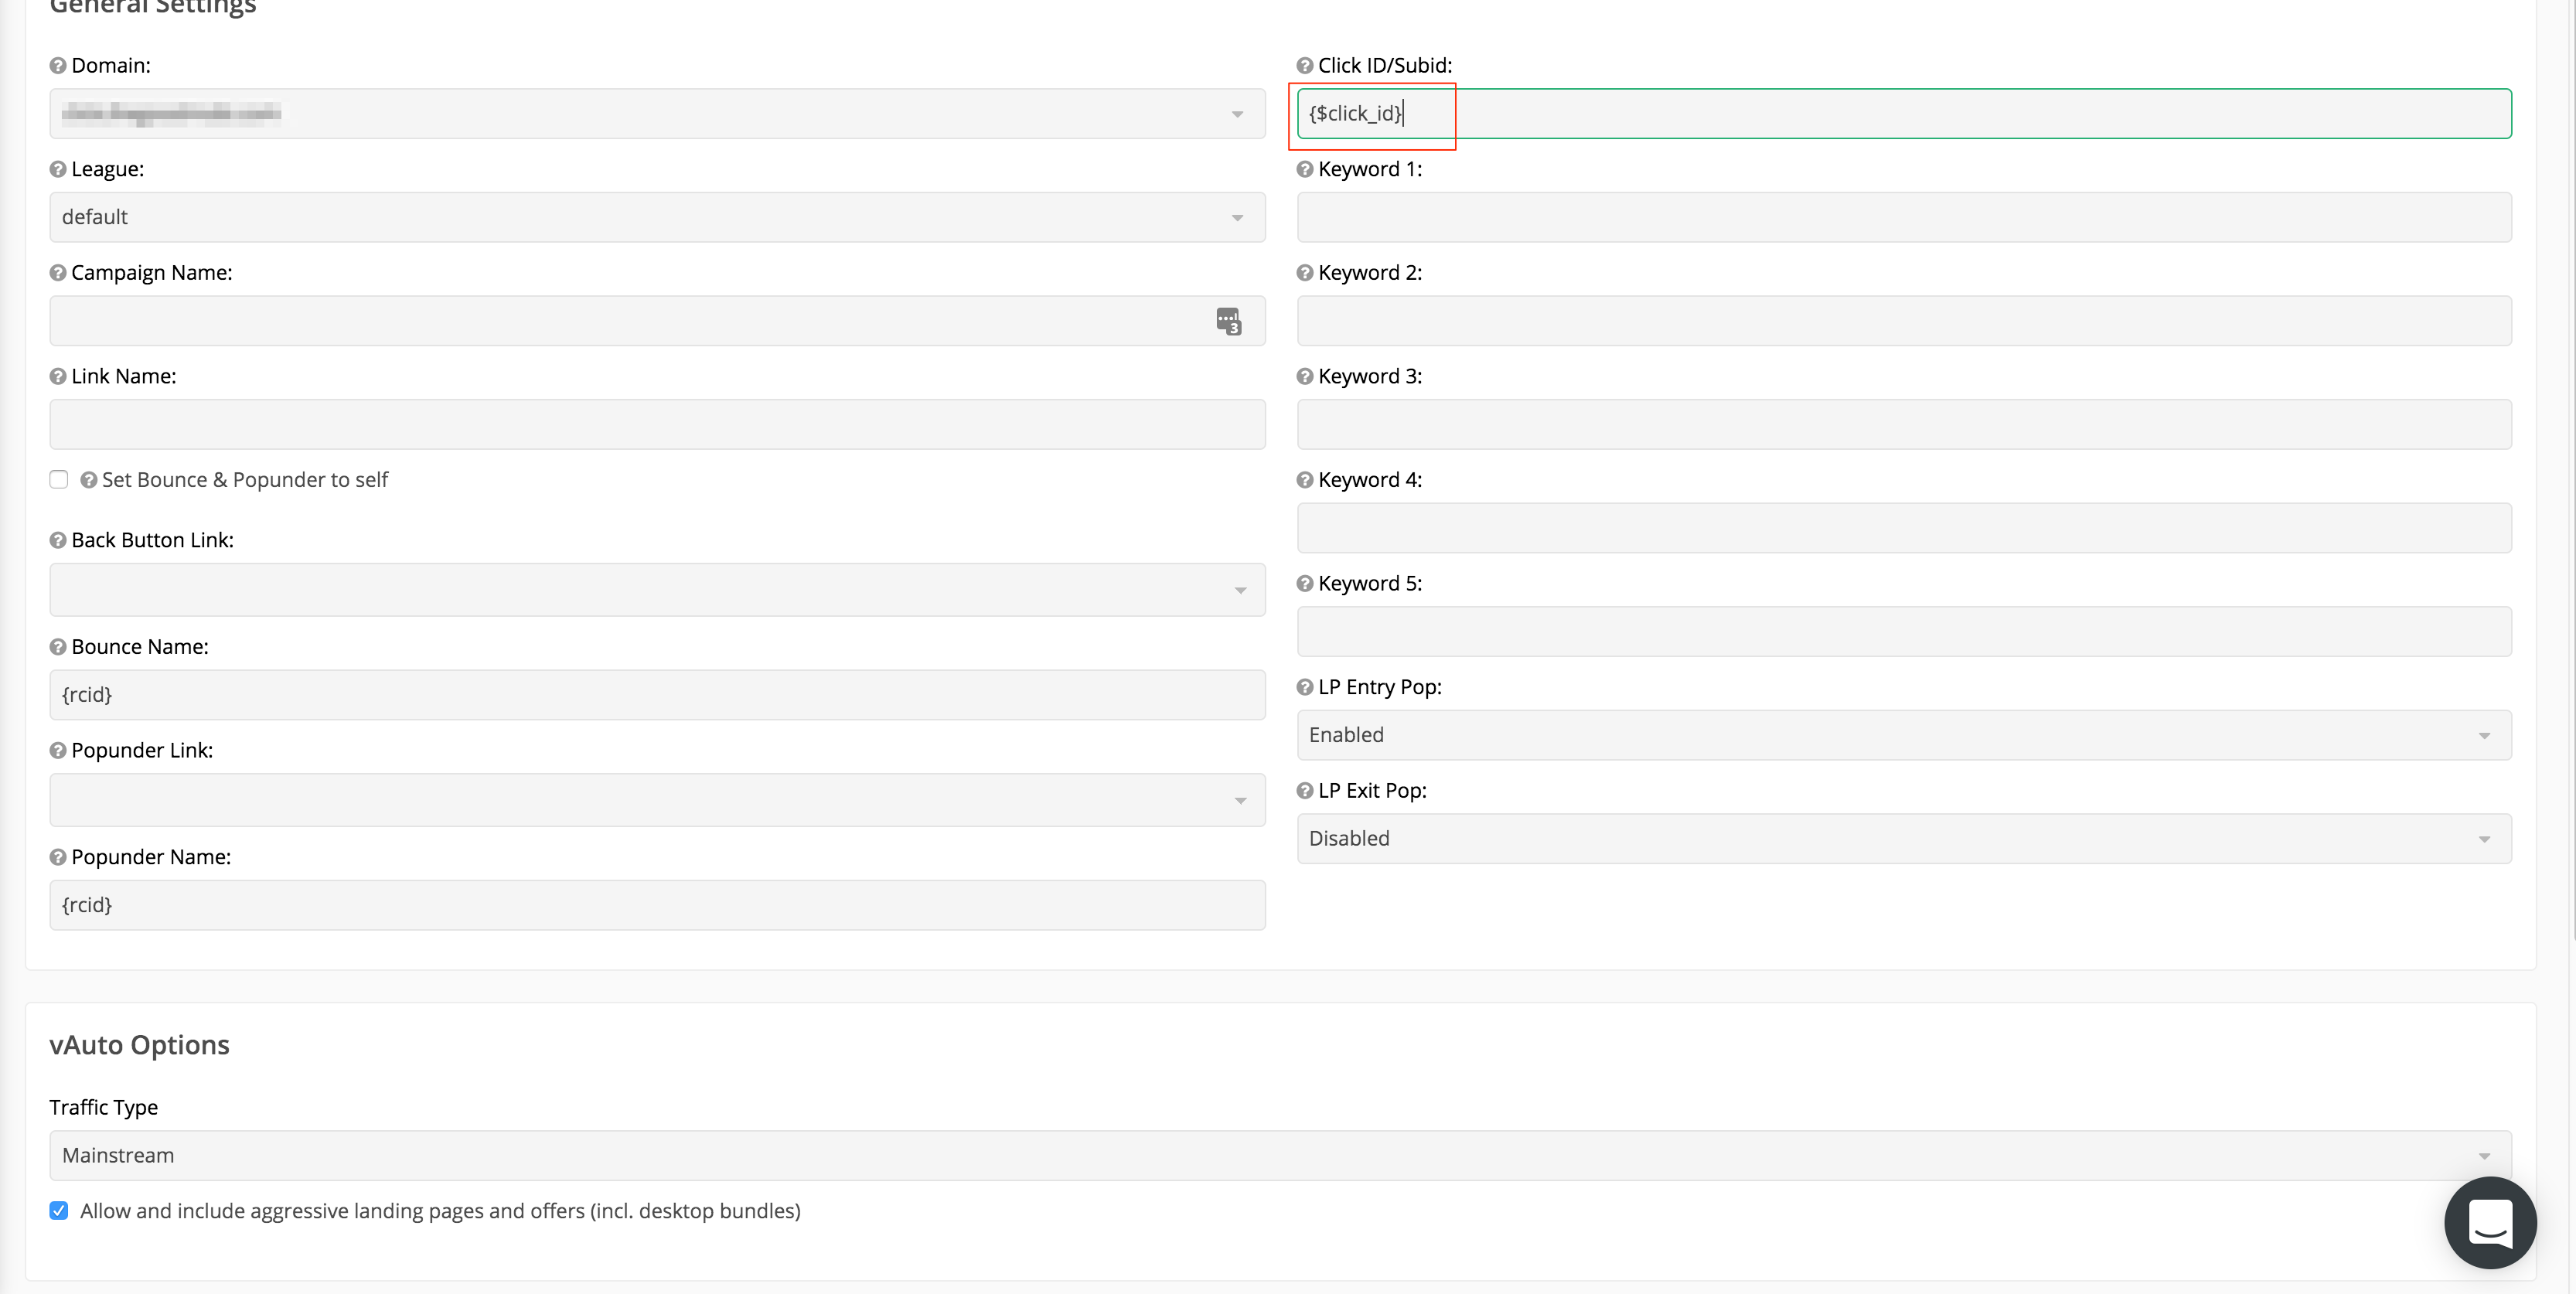
Once you’re ready, you can create a link/campaign at Monetizer, and in this case you need to add Plugrush’s click Id parameter to the link settings in the click id/sub id field. Once you click Save, you are given a URL which should be used as campaign’s URL at Plugrush.
Setting up conversion tracking between Mob Idea and PlugRush using our postback URL
To begin, set your global postback URL under ‘Custom’ inside the MobIdea user interface here.
As outlined above, you can find the postback URL to use in your PlugRush account here. You only need to modify two things in the URL provided.
The “click_id” and “payout” URL parameter tokens should be swapped as follows with MobIdea’s tokens {{EXTERNAL_ID}} and {{MONEY}}. In the provided example below, you only need to add your user ID and you’re good to go. You can find your user ID here.
After you’ve set up your postback URL in Mob Idea and go to grab a link to use for a campaign, you only need to change the &tag={External_ID_from_traffic_source} part of it to &tag={$click_id}.
Specific example: URL provided by Mob Idea…
…should be changed to…
That allows Mob Idea to track and store Click IDs (which uniquely identify visitors sent to your campaign) from us, so they can then fire the postback URL once a visitor you sent them from us converts. You will then see this conversion in your PlugRush campaign stats.
Setting up conversion tracking between Crak Revenue and PlugRush using our postback URL
With Crak Revenue, you can set up postback URLs on an offer basis. Here are the steps to make conversion tracking happen when sending traffic from PlugRush to Crak Rev.
We’ll give you all the details you need here, but you can also find the postback URL to use in your PlugRush account here. You only need to modify two things in the URL provided.
The “click_id” and “payout” URL parameter tokens should be swapped as follows with Crak Revenue‘s tokens {aff_sub} and {payout}.
When grabbing an offer link in Crak Rev, here are the steps to take:
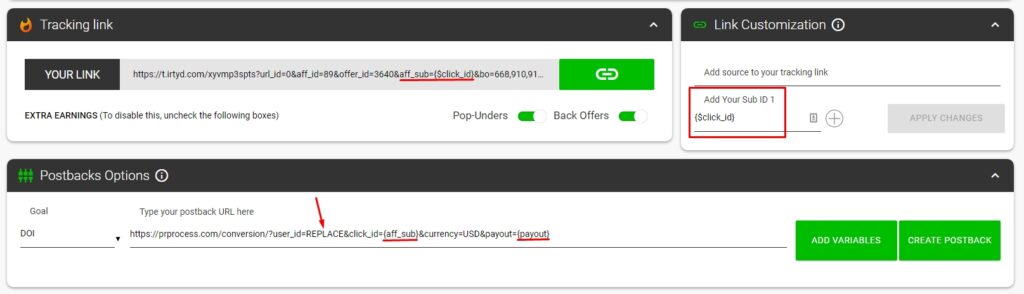
The images below the steps also illustrate what it should look like in Crak Revenue’s system.
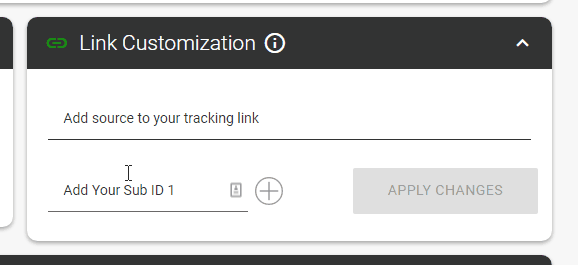
Step 1: Add the {$click_id} token to the Sub ID 1 field under “Link Customization”.
Step 2: Under “Postbacks Options”, put the following in the postback URL field:
https://prprocess.com/conversion/?user_id=REPLACE&click_id={aff_sub}¤cy=USD&payout={payout}
You need to add your user ID where it says REPLACE and you’re good to go. You can find your user ID here.
Step 3: Grab your tracking link and use it for creating a campaign in PlugRush.
Conversion information will then be passed back to our system and displayed in your stats inside the PlugRush user interface.
Setting up S2S conversion tracking between AdsBridge and PlugRush using our postback URL
AdsBridge made it very straightforward to set up conversion tracking between AdsBridge and PlugRush.
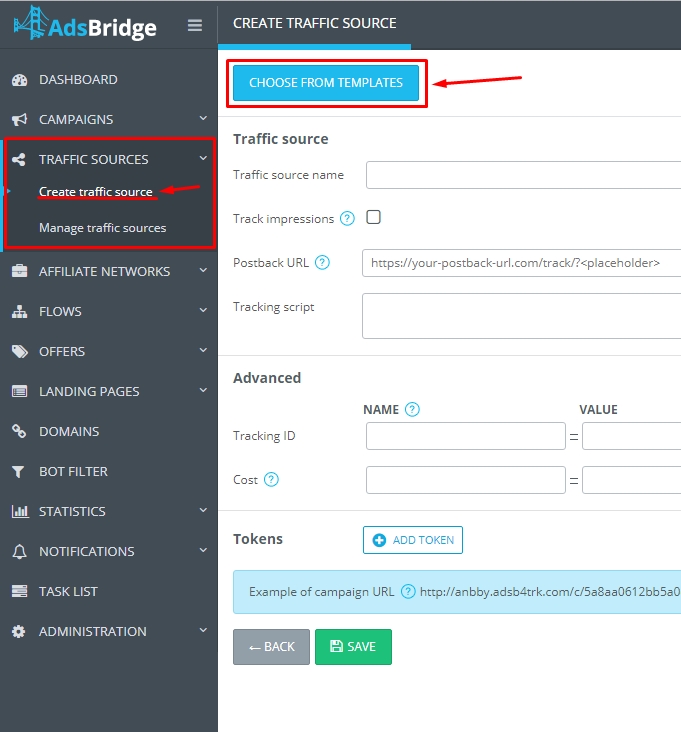
When you’re logged into AdsBridge, in the left sidebar click on ‘TRAFFIC SOURCES’ and then ‘Create traffic source’. On the page that loads, click on the blue ‘CHOOSE FROM TEMPLATES’ button at the top.
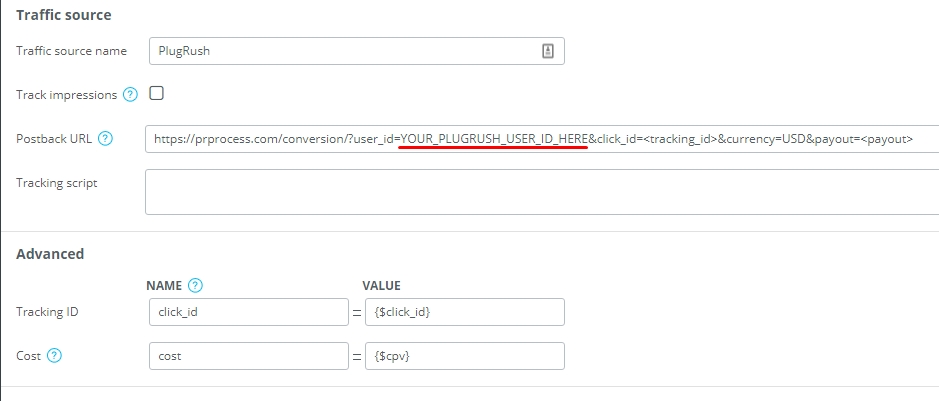
In the popup that follows with a list of templates, select ‘PlugRush’. The only change you need to make in the template, for conversion tracking to work properly, is to add your PlugRush user ID where it says YOUR_PLUGRUSH_USER_ID_HERE in the pre-filled postback URL. Your user ID for this can be found in your account profile inside PlugRush.
After your PlugRush user ID has been inserted there, just hit save and you’re good to go. Your future campaigns set up in AdsBridge for PlugRush will now have conversion tracking enabled.
Conversion tracking allows you to use Automated Rules
With conversion tracking set up, you can take advantage of the possibility to automatically optimize your ad campaigns using PlugRush Automated Rules. It will save you a bunch of time! (A reduction of 90% on optimization time is common among media buyers using Rules.)
Make sure you read the guide about Automated Rules to unlock the full potential of this very powerful auto-optimization feature.
Conclusion
Setting up S2S conversion tracking is a simple though very effective instrument in your arsenal of other means to optimise your campaign, choose the sources that work best for you, cut down your costs and get higher ROI.
So don’t waste time anymore, go ahead and set the tracking up with the help of this guide.
Hope this was helpful. If you still have any questions unanswered, please contact our Support Team via Zendesk, email or Skype.


