Automation is all the rage right now. Thanks to Automated Rules, it’s also going to make your life as a media buyer easier with automatic optimization.
Are you a serious media buyer or advertiser that would enjoy more free time? Or maybe you’d just like more time to strategize while an automatic system takes care of what you currently spend most of your working hours doing, which is optimizing campaigns. Either way, PlugRush has developed a solution for you: PlugRush Automated Rules
Our automatic optimization system is free to use, unlike other third party automation tools you may have come across previously. They can be applied on all delivery methods we have available (f.ex. pops, banners and native ads) for both mainstream and adult traffic. The possibilities are virtually endless.
What we’ll cover in this guide
- Why you need PlugRush Automated Rules as a media buyer or advertiser.
- Conversion tracking is required to use Rules.
- Setting up Custom Filters to be used for Automated Rules, along with examples.
- Creating Automated Rules for your campaigns to save a lot of time. Examples are of course provided for this as well.
Please continue reading, if you’re interested in the above. If not, please look through our other guides to find information about numerous other topics with regards to buying & selling traffic.
As a media buyer, you need Automated Rules in your life to save time! Stop manually optimizing and enjoy more free time.
In this helpful guide, you will learn how to set up Custom Filters and use them to create Automated Rules, which can in turn be used to automatically optimize your campaigns. All while you sleep (or do anything else you enjoy more than campaign optimization).
Based on extensive internal testing by our in-house media buyers, you will save a whopping 86.67% of your optimization time by using the Automated Rules feature. That is a ton of time, when you consider it’s their primary task… or at least it used to be. When we first calculated this percentage, it blew our minds that just one new addition to our arsenal of optimization tools could make such a large difference. We double-checked… and it’s true. 86.67% is the number.
Instead of going through each campaign multiple times daily to locate the Sources that convert to unlimit them or add them to a whitelist campaign where you’re bidding higher, you can now create a few Custom Filters and have those do this work for you. You can also have them exclude low-performing Sources, Sub-Sources, countries, browsers, OS, languages, etc.
Required to use Automated Rules: Conversion Tracking
While all advertisers in our network are welcome to use the PlugRush Automated Rules feature we have developed, it only makes sense if you meet the following single requirement:
You’re using conversion tracking.
If you haven’t set up conversion tracking yet to pass back your conversion numbers to PlugRush, so we can display them in your campaign stats, then it’s time to take care of this very important step on your path to having your campaigns automatically optimize themselves.
You can obtain your conversion tracking URL to use here under ‘Server to Server Conversion Tracking’, where you’ll also find some basic instructions on how to use it. For a more detailed description of how it works and how to use Server to Server (S2S) conversion tracking, please read our Conversion Tracking Guide.
Once you’ve grasped the basic concept of how conversion tracking works, it’s fairly straightforward to set up with most affiliate networks that are providing your offers. Most support the ability to pass back conversions to your traffic source (in this case PlugRush) with an S2S system at this point.
Creating Custom Filters
Once conversion tracking is in place and you’re seeing the conversions generated in the campaign overview and it’s sub-tabs, you can then move on to creating some Custom Filters on that same page.
Custom Filters allow you to break down the campaign index to show only campaigns that are important to you, but they’re also needed to create Automated Rules because they are what will dictate when a given Rule should be enforced.
Click the Rules button on the campaign overview page to start. Custom Filters can be created there. For most people, it will be easiest to learn with some quick examples.
Example 1: A custom filter based on campaign traffic
From the Rules interface, you can easily create a Custom Filter that will, for example, act as part of a Rule that will take effect once a breakdown item (f.ex. Source, Subsource, or browser) has received 1,000 visitors worth of traffic from an ad campaign.
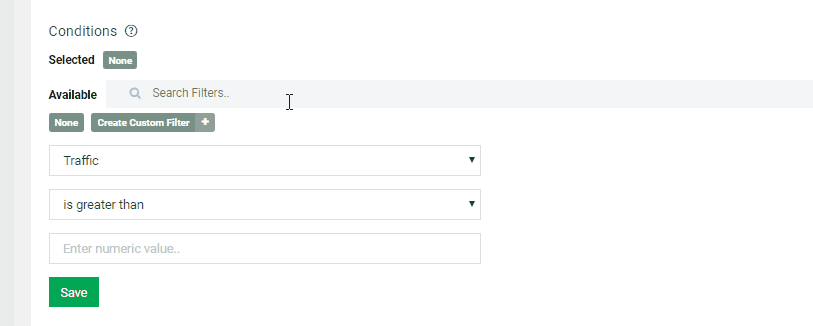
You’ll be able to use this sort of Filter to limit which Sources, countries, carriers, etc. a given Rule should affect.
Example 2: A custom filter based on conversions
This too will be a useful filter for most advertisers looking to create a successful automatic optimization strategy that will save them a lot of time. You can filter a given breakdown by how many conversions were generated. For this example, we’ll say that we want our future Rule to kick in after one conversion for a certain Source has been generated. So we need a Filter for conversions greater than or equal to 1.

Other things you can create Custom Filters for
As you’ll find out in the next section of this guide, you will generally want to use more than one Custom Filter when creating an Automated Rule that makes sense. For this reason, there are a number of metrics you can create Filters for, which you can then combine to generate worthwhile Rules.
Custom Filters can be created for: Average CPC (cost per click), CPM (cost per 1,000 clicks), RPM (revenue per 1,000 clicks), traffic, cost, win rate, conversions, conversions amount, conversion rate (CR), Return on Investment (ROI), and profit.
Important note: Not all of the above filterable metrics make sense to use for Automated Rules, while they can still be beneficial during stats analysis. More on this idea will be made clear in the remainder of this guide.
Please spend a bit of time playing around with the Custom Filters feature to understand fully how it works. Don’t worry about creating too many Filters, as you’re free to delete any of them at any time.
Creating Automated Rules
After you’ve created some Custom Filters, it’s time to use them for Automated Rules so you can get well on your way to optimal and automatic optimization of all your campaigns with PlugRush.
Filters based on the following metrics lend themselves well for creating Rules with:
- Conversions
- Conversions amount
- Conversion rate
- Traffic
- Cost
- Win Rate
- Return on Investment
- Profit
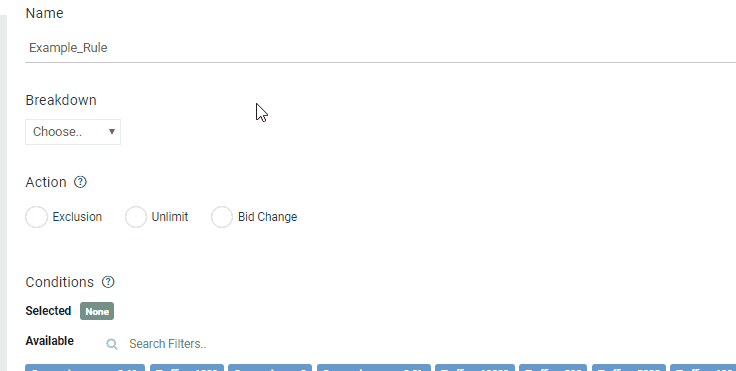
It’s possible to create Rules for various breakdown options
When you normally optimize your campaign, you probably do more than just excluding Sources and Sub-Sources from your campaigns. For this reason, we wanted to make sure that our automatic optimization system can be customized the same way, so we added support for a variety of breakdown options:
- Sources (Possible actions: Exclude, Unlimit, Bid Change)
- Subsources (Possible actions: Exclude, Unlimit, Bid Change)
- Countries (Possible actions: Exclude, Bid Change)
- Carriers (Possible actions: Exclude, Bid Change)
- Browsers (Possible actions: Exclude, Bid Change)
- OS (Possible actions: Exclude, Bid Change)
- Languages (Possible actions: Exclude, Bid Change)
A very important note about Sources and Subsources
A Source is a top level Referrer Source in the ‘Sources’ tab of the campaign index. A Subsource is more specific underneath the top level Source and allows for more precise optimization. The image below illustrates this.
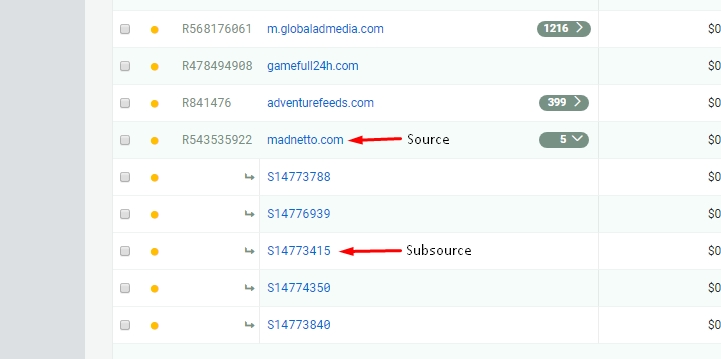
We recommend using Subsources whenever possible, especially when using an exclude Rule. The reason is that a top level Referrer Source may contain a very large number of Sub-Sources that can have traffic of varying quality. If you exclude an entire Source, you may potentially miss out on good quality traffic from some of its Subsources, so choose wisely what you set Automated Rules for!
Rules can only be applied to visible campaigns
It’s very important to note that you can only apply Rules to the current list of campaigns you have pulled up in the campaign overview.
To make searching for the relevant campaigns easy, you must have a good naming system for your campaigns. For example, name all your campaigns based on the following template: _GEO_TrafficType_DeliveryMethod_OfferNumber
In practice, this would mean a campaign targeting Italy mobile pops for offer number 12345 would be named: IT_Mob_Pop_12345
Of course, you should come up with a system that works for you. The main point is that you should name your campaigns in a way that makes them easy to search for, so you can quickly pull up some campaigns you’ll want to apply a given Automated Rule to.
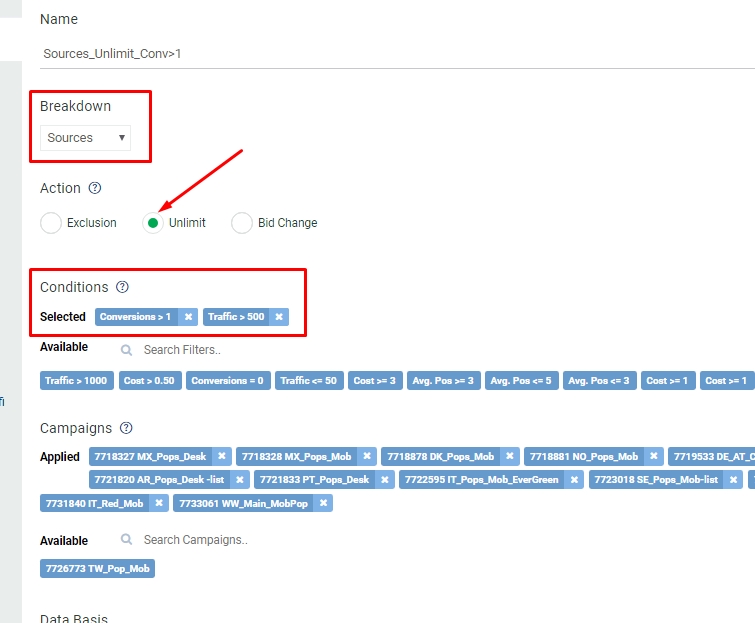
Rule Example 1: Unlimit good Sources that convert
It’s important to unlimit good Sources in your campaigns to scale them properly and get more well-performing traffic, but going through your campaign stats to find the Sources that have converted can be tedious to do multiple times daily. So an Automated Rule to do the grunt work for you is an excellent solution to save some time.
Let’s say you generally unlimit Sources that have sent 500 visitors and generated more than one conversion (so two or more conversions to make sure the first one wasn’t just lucky). Below is what that Rule setup would look like.
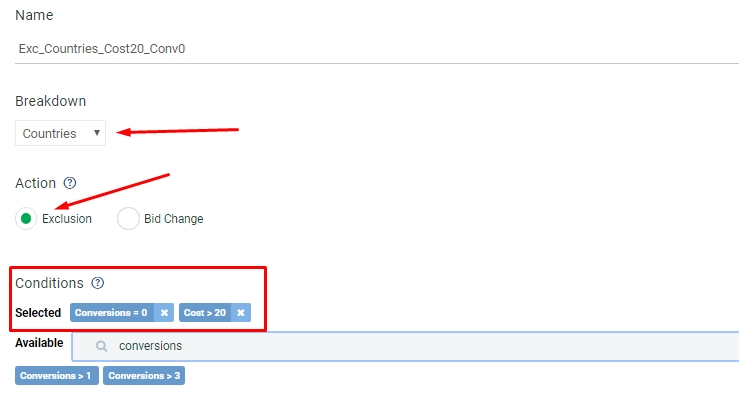
Rule Example 2: Exclude countries performing poorly
Sometimes, you may start a campaign with several countries selected, but as it runs you notice that one or several of the countries aren’t producing any conversions for your offer(s). In the past, you would’ve had to go edit the campaign and remove the countries that aren’t performing well manually. This would take time out of your busy schedule each day.
A Rule to do the same thing would literally take you a couple minutes to set up and then continuously exclude underperforming countries. Sounds pretty amazing, right? Here is how this Rule could look. You can of course customize the setup however you’d like! It’s only one example out of endless possibilities.
Our Rule, as pictured below, would exclude all countries that you’ve bought more than $20 worth of traffic from without a conversion.
Rule Example 3: Increase bid on a good Subsource
Imagine that you find yourself in the following situation:
- You have an offer that generates $10 per conversion.
- You spent $10 on a certain Subsource and it has converted three times already, leaving you with a $20 profit off of that one Subsource alone.
Before there were Rules, you would’ve had to add the Subsource to a whitelist manually and then assign that to a separate campaign where you bid higher. Sounds like a lot of work, because it is! Luckily, you don’t have to do that anymore with the power of Automated Rules at your disposal.
Instead, you can set up a Rule like the following to automatically increase your bid by a percentage you choose when certain parameters are met. In the example below, your bid would automatically increase by 100% (so it would double effectively) when a Subsource has spent $10 or less, but already converted two or more times.
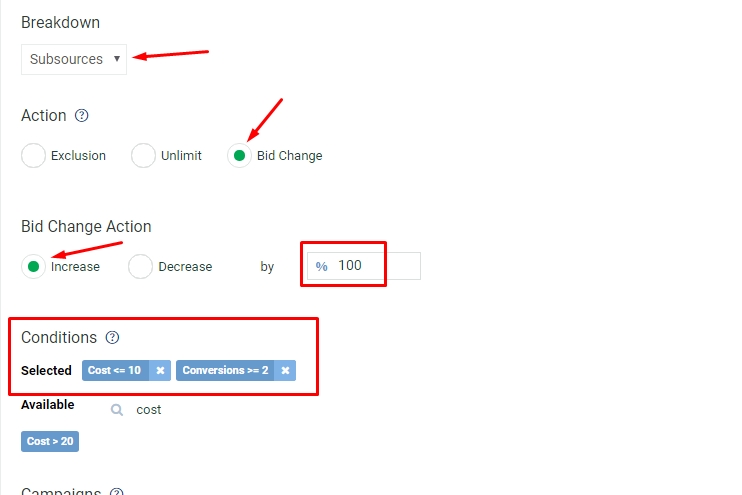
Why is it important to raise the bid on good Subsources? It’s simple. A higher CPC bid increases your Average Position. And a higher Average Position means you get visitors before they have been exposed to a lot of advertising already. This makes them more likely to convert by default. When a Subsource is performing really well, it’s always a good idea to increase your bid on it! And now you can do it automatically.
Avoid overlapping Rules! Here is why…
When two Rules overlap, the system will only apply one of them. Once your Rules for a campaign have been processed, it will detect if this is the case and put an exclamation mark (!) next to them as shown below.
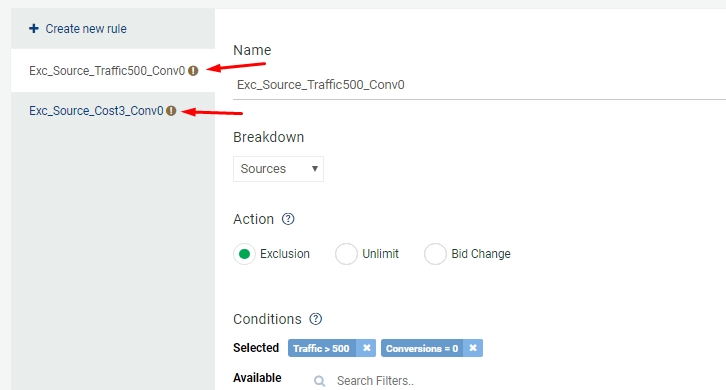
Additionally, there will be a warning in the Rule editor for them to make very sure that you’re aware you’ve created Automated Rules that overwrite each other for the same campaign(s).
A concrete example of two overlapping Rules: The premise: You have a campaign with a $0.003 CPC bid placed on it. You create two Rules:
- Exclude Sources with 0 conversions that have received more than 500 clicks / traffic.
- Exclude Sources with 0 conversions that have a cost greater than $3.
In this scenario, the system will not apply the first Rule, because 500 clicks worth of traffic is less than $3 (your bid of $0.003 x 500 clicks = $1.50). But it would apply the second Rule instead.
Thank you for reading!
We really appreciate that you’ve taken the time to read this somewhat lengthy guide about one of our features we’re most proud of. If you still have some questions, please contact our support team. And always remember: You make the Rules. PlugRush delivers results!


